This blog will cover the design and build process of my NAR Level 3 certification rocket. If you haven’t yet, check out how I designed and built my Level 1 and 2 rockets over on Behance! Follow along as I describe the airframe design and fin/aero surface design, build the airframe and electronics (soontm), and (soontm) take it for a test flight!
Motivation
During my first 3 years in AerospaceNU, Northeastern’s rocketry club, we’ve regularly flown increasingly larger rocket motors and complex rockets. NAR limits the rocket motor impulse we can fly with Level 2 certifications to under 5,120 Newton-seconds, or an L-class motor (below). For our club to continue building large rockets and continue to set club speed and altitude records, we’ll need to fly rockets above this limit. A Level 3 certification would allow me to fly rockets with up to 40,960 Newton-seconds of impulse, or O-class rocket motors!
 L265 rocket motor for scale. Level 3 motors are up to 10x larger!
The Level 3 certification process through NAR (National Association of Rocketry) is pretty straightforward. After gaining your Level 1 and 2 certifications, you’ll need to find a local member of the Level 3 Certification Committee, rocketeers who have proven their modeling skills and volunteer to mentor others, and propose the project to them. Once you get the go-ahead, you can start building the rocket, documenting the process as you go. Once the rocket’s ready, you present design and build documentation to your L3CC mentor, and then successfully fly your rocket on a Level-3-class rocket motor. Level-3-class rocket motor can get stupidly expensive – they start at $350, and can cost over $2000. (Rocketry is definitely my hobby with the worst dollars-per-second ratio, beating sailing by a good margin.)
Design Philosophy
For certification flights in general, people generally come down in the side of either building super conservatively to maximize your chance of success, or build crazy high-performance Level 3 attempt rockets. On the one hand, you’ll have plenty more opportunities to crash big rockets once you’ve completed your cert, and mentors are generally more likely to get on board with a conservative project than a spicy one. On the other, your Level 3 project can also be a great excuse to build a fun (read: very fast) high-power rocket that pushes the performance envelope while working a bit more directly with a mentor. The certification requirement to recover your rocket undamaged in order to pass also drives these trades.
I personally decided to build conservatively in some respects. I’m (planning to) do things like using commercial-off-the-shelf (COTS) electronics, a simple mechanical design for my electronics bay, a traditional parachute deployment setup using black powder for separation, and a hugely overbuilt fin section made of layers of carbon fiber epoxied on top of a fiberglass core. There wer a few core requirements I had while going through the design process:
- I want to keep the design simple. This means there are fewer moving pieces to worry about, and I can focus my attention more on making sure the important systems work well together. This applies to all major subsystems, including airframe, recovery, and electronics. This requirement also plays into:
- I wanted to maximize my chances of getting the rocket back undamaged. If a fin is bent a bit when the rocket lands, that would mean I’d need to re-do my certification flight, and I’d need to purchase another expensive rocket motor.
- I want to easily transport this thing. I don’t know where I’d keep a 10+ foot tall rocket, and my car is only so big.
High-Level Design
Some high-level specs of the rocket design are shown below. I’m aiming to keep the rocket below the 10,000 ft altitude ceiling at my local club in Vermont. This design hits on those 3 overarching requirements outlined above by being a squat, simple, over-built kit rocket.
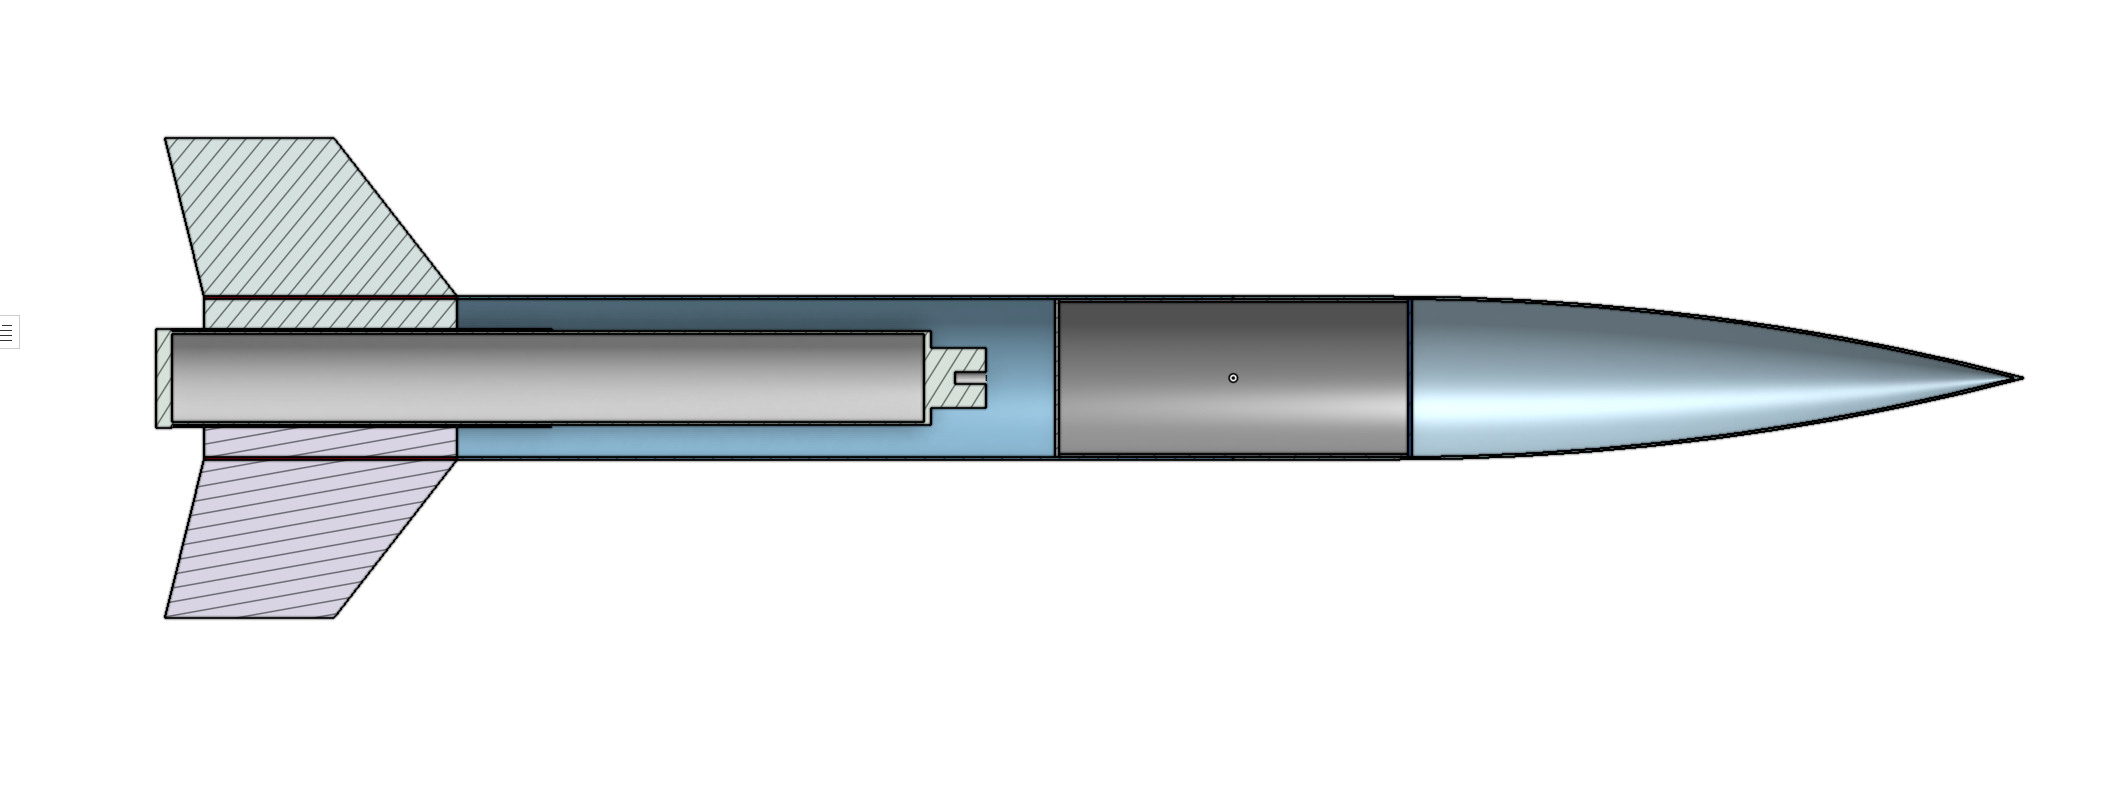
I chose the Goblin 5 kit from 5" upscale Goblin kit from Wildman Rocketry for this project. This stout rocket is nearly the shortest a Level 3 rocket with a 75mm rocket motor can realistically get, and should fit comfortably into the trunk of my car. The whole fin section is epoxied to the main airframe tube and motor mount tube, and then will be further stiffened with a carbon fiber layup over the fins. This means the whole lower 3/4 of the rocket will just be a solid composite piece that should ideally be overbuilt enough to survive hitting the ground ballistically. Moving forwards up the rocket, the only other mechanically involved component is the electronics bay (red box, below) that parachutes attach to and flight computers live inside. Choosing a 5-inch-diameter rocket gives me plenty of room inside of the electronics bay to organize wiring and fit a full suite of electronics without becoming cramped, like some past projects of mine.
| Parameter | Value |
|---|---|
| Construction | 5 in fiberglass airframe (Goblin 5) |
| Rocket length | 61 in |
| Rocket motor | AeroTech M1297-White Lighting (75mm, 4 grains) |
| Weight, wet | 10.4 kg |
| Weight, dry | 5.8 kg |
| Drag coefficient, CD | 0.54 |
| Rail exit velocity, 10ft rail | 106 ft/s |
| Maximum altitude | 9400 ft AGL |
| Maximum velocity | 1233 ft/s |
| Launch acceleration | 18 G’s |
| Launch stability | 1.55 Calibers, or 15% overall length |
| Loaded CG location | 37.6 in from tip |
| Loaded CP location | 47 in from tip |
| Drogue parachute & speed | 24in round, 80 ft/s |
| Main parachute & speed | 60in Iris (toroidal), 18 ft/s |
My budget also ended up being fairly reasonable, thanks to leveraging supplies like parachutes and electronics from the AerospceNU lab. The whole project was funded by the club (and I guess transitively through my tuition), for which I am grateful.
| Item | Cost |
|---|---|
| M1297 AT 75mm-4 grain Reload | $339 |
| CTI 75mm/4 Grain Motor Casing | $0 |
| Goblin 5 Kit | $297 |
| 60in Toroidal Parachute | $0 |
| 21 in Drogue Parachute | $0 |
| Wildman Shipping | $93.70 |
| Soller 3k twill, 6 yards | $94.95 |
| Soller 820 epoxy + 824 slow hardener, quart | $59.98 |
| Peel ply, >1 yard | $23 |
| EasyMini Altimeters | $0 |
| 1s LiPo Batteries | $0 |
| Av-bay Threaded Rod & Hardware | $0 |
| EggFinder Mini GPS tracker | $0 |
| Spray Paint | $0 |
| Total | $908 |